Artwork Specifications

We strongly recommend that you send us a PDF file for printing as this will usually give the best results.

Most software applications have the option to Save As or Export As PDF. Do this direct from the software you have used. It is not usually beneficial to convert from, say, JPEG to PDF.

Microsoft Office files such as Word, Powerpoint and Publisher can sometimes change when opened on a different computer; saving them as a PDF will help avoid this.

If your software has the option to export as spreads, do not use this – export as pages instead. For example, in Adobe InDesign:


If you use Canva, there are instructions here.


Most printing machines – including the ones we use at MuPrint – do not print right up to the edge of the paper. Anything that you see that has been printed up to the edge of the paper will probably have been printed on larger paper and then cut down to the finished size. For this process to work successfully, your artwork must be correctly set up with a bleed
 
A bleed is an extension of any background picture or colour that goes beyond the boundaries of the page – typically 3mm on each of the 4 sides – and this then gets trimmed off after printing. Without a bleed, you will probably get white bits showing at the edges of the paper which will spoil the end result.
 
You can read more about a bleed on Wikipedia. There is a useful guide here which explains how to add a bleed to your document in Adobe InDesign. The exact process will be different for other software but the principle is the same.
 
Some software applications have the option to specify a bleed when you create a document. You would then extend the background or picture up to a line around the outer edge of the page. With other software, you might have to define a custom page size that is 6mm larger in each dimension than the final page size you require.
 
It’s also important that you don’t have any text or graphics too close to the edges of the finished pages. We suggest leaving 3mm inside the finished page so that nothing important gets trimmed off when we cut to the required size.
 
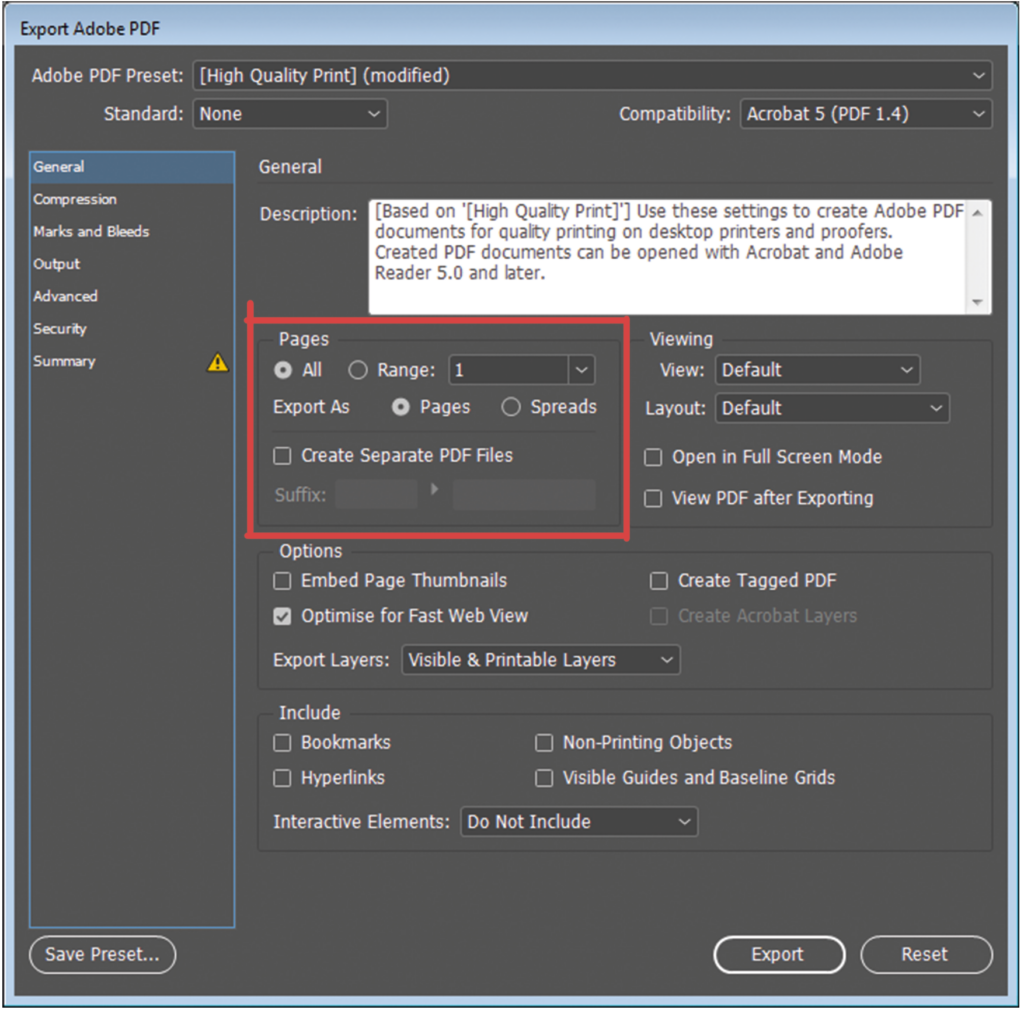
Note that if you use Adobe InDesign, then the bleed is not normally exported to a PDF by default. You must ensure that the “Use Document Bleed Settings” option is ticked on the “Marks and Bleeds” screen when you export to PDF – see image below.


This is too complicated for me – any suggestions?

If you do not have suitable software or the skills to do this precisely, then there is a workaround that you can try. Send artwork with all text and graphics well inside the edge of the background picture or colour e.g. 1-2cm at the required print size. That should hopefully give us sufficient room to print and trim so that it goes right up to the edge of the paper. But please be aware that as it’s a compromise, this might mean that we cut off something on the background photo that you might not want to lose.


Large Posters – No Bleed Required

We trim large posters (A2, A1, A0) and other inkjet prints individually by hand which means that you do not need to add a bleed for these.

We recommend artwork with a resolution of 300 to 600 pixels per inch (or dpi). PDF files are recommended especially if you have small text on the card as this will help them to be printed as sharp as possible. N.B. If saving as a PDF from Photoshop, do not flatten it and make sure the Save Layers option is ticked.

Top Tip: Don’t make text too small. It will not print clearly and people will have trouble reading it. Remember that the card will be the same size as a bank card and not a computer screen!

If you cannot make a PDF file then you can also supply artwork in many different formats e.g. EPS, PSD, TIFF, JPEG. If JPEG, save with the highest possible quality and resolution settings.

For cards with a white border: For best results, ensure all text/graphics are at least 3mm away from the edge. If artwork is a different size/proportion then we will adjust the white border accordingly. 

For cards printed to the edge: Artwork must be the finished size of the card plus at least a 3mm bleed (see above) on each of the 4 sides This means that the artwork must be 91mm x 61mm.

Ensure all text/graphics are at least 3mm inside the finished edge. If artwork does not conform with the specifications then additional charges may apply or, in some circumstances we might not be able to print the cards at all.

Folded & Stapled Booklets such as Magazines and Programmes always have a multiple of 4 pages. This is because when a sheet of paper is folded in half, it can hold 4 pages. Therefore, 8, 12, 16 pages is good but if you have, for example, 14 pages you would need to add 2 pages to make it up to 16.

You can send your PDF file to us with pages in the normal order that they are to be read: 1, 2, 3, 4 etc. You do not need to worry about which pages get printed onto which sheet of paper as the printer software will do this automatically. Blank pages can be added if your file doesn’t have a multiple of 4 pages. If you prefer to impose the pages yourself for booklet printing, that’s OK but you must do it correctly.

If your software has the option to export as spreads, do not use this – export as pages instead.

If you’re designing your own drinks coaster, for example, remember to add in a layer in your artwork to tell us where the edge of it should be. (Circular, square, rounded corners…? We need to know!)
 

Share This Post

How to Make a PDF

A PDF file is the best way to ensure that your files print correctly when you bring them to MuPrint. You can spend ages getting it right on your computer

Read More »