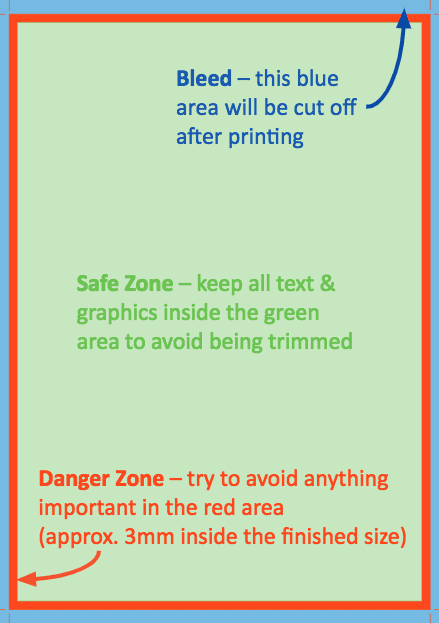
If you’re using Adobe InDesign, you define a bleed when you create a new document. However, when you’ve finished the document and wish to save it as a PDF, the bleed will not be automatically included. Use this process to ensure that the bleed is in the PDF:
- Go to File menu, then Export
- Choose Adobe PDF (Print) and choose where to save the file
- Click Marks and Bleeds on the left; ensure that All Printers’ Marks and Use Document Bleed Settings are both ticked
- Click Export at the bottom
Whatever software you use, always check that the bleed is in the PDF as this will save time later.
Print Resolution
Files for printing need to be a much higher resolution than what you might see on a computer screen, otherwise text might not look very sharp when printed. If possible, save your artwork as a PDF file from the original software* as this should then print the text and some graphics at the maximum resolution of the printer. This is particularly important with business cards where the text is often small.
*Converting from a bitmap graphic such as JPEG or TIFF to a PDF won’t improve it – it’s best to save as PDF from the original software if possible.
If you use Photoshop to create a file with text, keep it in layers i.e. do not flatten or merge the layers, and Save As a Photoshop PDF. The text will then print at the resolution of the printer.
If you have low resolution graphics such as small pictures from websites then they are unlikely to look very good unless you make them smaller.
If you cannot save as a PDF then we recommend a minimum resolution of 300 pixels (or dots) per inch at the size required. If you’re not sure what this is then the approximate pixel sizes are below:
| Required size |
Size in pixels |
| Business card (85 x 54mm) |
1000 x 640 |
| A6 (105 x 148mm) |
1240 x 1750 |
| A5 (148 x 210mm) |
1750 x 2480 |
| A4 (210 x 297mm) |
2480 x 3500 |
| A3 (297 x 420mm) |
3500 x 5000 |
Bear in mind that these are recommended minimums so if you have a larger size in pixels, then it could look better.
If you take a small file and print it larger then the effective resolution is reduced. For example, scaling up A6 to A4 halves the resolution.
If your file is lower resolution than we recommend and you cannot make a better version then it might still be acceptable to you; ask for a test print. Low resolution can still be legible – just not as good as it could be.
For larger prints such as A2/A1/A0 posters, people tend not to look at these so closely so you can get away with a lower resolution e.g. 200 pixels per inch. However, if you have small text, you may want a higher resolution than this. Again, if you can save in PDF from the original software this is likely to give the best results anyway.
| Required Size |
Size in pixels |
| A2 (420 x 594mm) |
3310 x 4680 |
| A1 (594 x 841mm) |
4680 x 6620 |
| A0 (841 x 1189mm) |
6620 x 9360 |